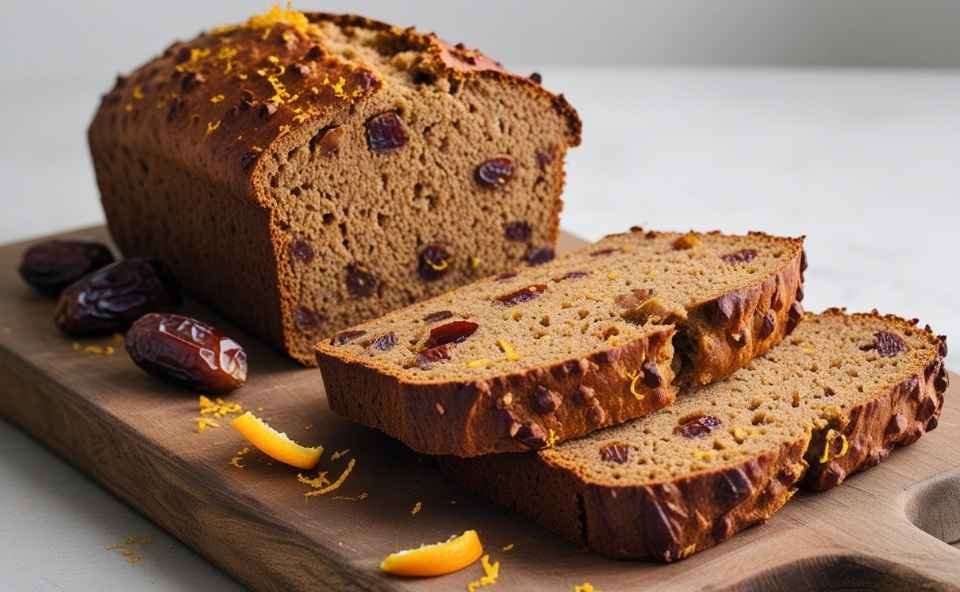
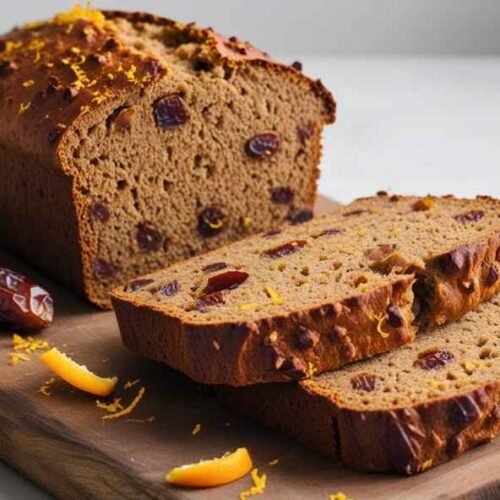
There’s something truly special about baking gluten-free buckwheat bread from scratch. Every time I step into the kitchen, I’m reminded of the magic that happens when unique ingredients come together in perfect harmony. The earthy goodness of buckwheat gives the bread a hearty base, while the rich sweetness of molasses and the warm notes of cinnamon create a comforting, cozy flavor. A hint of spice, paired with the bright zest of orange, brings out the most vibrant flavors, making each bite feel like a treat.
What I love most about this recipe is how the entire process engages the senses. As the loaf bakes, the air fills with tantalizing scents, blending the deep aroma of citrus with the toasty warmth of freshly baked bread. It’s not just about making something delicious—it’s about crafting a truly nourishing experience, one that brings comfort and joy with every slice. Whether enjoyed fresh out of the oven or toasted with a drizzle of honey, this bread is a reminder of how simple, wholesome ingredients can create something truly special.
If you’re curious about buckwheat, my Buckwheat Ultimate Guide has everything you need to know!
My Four Goals for the Perfect Buckwheat Bread
When I first decided to bake a loaf of gluten-free bread using only buckwheat flour, I was both excited and hesitant. Many people turn to buckwheat flour as a gluten-free alternative to regular flour, but I wanted more than just a replacement. I wanted something truly delicious. Instead of using an all-purpose blend, I was determined to create a simple yet flavorful bread that anyone could enjoy.
- 1. Keep It 100% Gluten-Free; Since I knew many of my friends and family followed a gluten-free diet, I made it my priority to ensure that this bread was completely safe for them. In most recipes, I found mixed buckwheat flour with other flours, but I wanted a pure, no-compromise option that stayed true to its natural form.
- 2. Use Simple and Accessible Ingredients; One of my biggest frustrations with gluten-free baking was the reliance on exotic choices like xanthan gum and psyllium husk powder ingredients, which I rarely needed outside of one or two recipes. I didn’t want to make a trip to a speciality store just to get started. Instead, I focused on simple ingredients that anyone could easily purchase at their local grocery store, making this recipe as accessible as possible.
- 3. Create a Delicious and Balanced Flavor; I’ll be honest, I wasn’t always a fan of buckwheat flour. Its naturally nutty and slightly smoke-like taste never really appealed to me on its own. But then, I discovered a secret: it pairs beautifully with the richness of molasses. A touch of cinnamon softened the punchy notes, while fresh citrus added a bright note, making the overall flavor smoother and more enjoyable. This transformed the bread into something that perfectly balanced the dark palate of buckwheat with a bit of natural sweetness.
- 4. Make It Enjoyable for Everyone; Creating this recipe was a true challenge, but—spoiler alert—I made it work! The deep, earthy flavors of buckwheat flour, the natural sweetness of molasses, and the warmth of cinnamon turned this bread into something I now crave. Seeing my family enjoy it was the ultimate reward, proving that with the right balance, even a simple loaf of bread can bring joy to the table.
Alright, let’s jump in and get started, you’re going to love this!
Ingredients
- Buckwheat Flour
- Honey
- Milk
- Salt
- Molasses
- Baking Powder
- Cinnamon
- Orange Zest
- Chopped Dried Dates (Optional)
- Chopped Nuts (Optional)
To see their quantities, please see our recipe card.
Instructions/Steps

- Get the Baking Equipment Ready; Before I even think about mixing ingredients, I always grease my trusty 8×4-inch loaf pan. This little step saves me from the frustration of bread sticking to the pan later. At the same time, I preheat the oven to 325 degrees—this way, it’s at the perfect temperature by the time I’m ready to bake.
- Mix the Dry Ingredients; Now, it’s time to bring together the foundation of the bread. In a mixing bowl, I combine buckwheat flour, salt, baking powder, and cinnamon. I take a moment to stir everything well, making sure each ingredient is evenly spread. This is what gives the bread its unique nutty and spiced flavor.
- Combine the Dry and Wet Ingredients; I grab my large mixing bowl and pour in the milk, slowly adding the dry ingredients—buckwheat flour, cinnamon, salt, and baking powder. Mixing them in this order makes it easier to achieve a smooth batter without any stubborn lumps. I love watching the dry ingredients soak up the milk, transforming it into a thick, rich mixture.
- Pour Milk Over the Dry Ingredients; I take my bowl of dry ingredients and slowly pour the milk on top. As I do this, I notice how the buckwheat flour starts soaking up the liquid, turning into a smooth, thick mixture. I always enjoy this step because it’s the moment when everything begins to come together for a perfect bread batter.
- Stir in the Wet Ingredients; To make the batter even richer, I add milk, honey, and molasses to the large bowl. Using a spoon, I stir everything well, making sure the ingredients blend together smoothly. The honey and molasses bring in a warm sweetness, making this bread feel extra special.
- Add Extra Flavorings; At this point, the buckwheat bread batter is coming together, and I get excited to add some extra flavor. I sprinkle orange zest and chopped dates on top—these small additions make a huge difference! The orange zest adds a fresh citrus aroma, while the dates bring in a subtle sweetness.
- Gently Fold in the Ingredients; Now, I take my time to carefully fold in the orange zest and dates. I want every bite of the bread to have the perfect balance of zest and sweetness, so I mix gently to keep the batter light and fluffy.
- Transfer the Batter to the Bread Pan; With everything combined, it’s time to pour the batter into the bread pan. I make sure to spread it evenly so it bakes properly. At this point, the scent of cinnamon and orange zest already fills the kitchen, making me even more eager to taste the final result.
- Bake the Bread; Now comes the most rewarding part—baking! I place the loaf tin into the 325-degree oven and let it bake for 45 minutes. I love peeking through the oven door as the batter slowly rises, turning into a beautifully golden loaf.
- Let the Bread Cool; Now comes the most rewarding part—baking! I place the loaf tin into the 325-degree oven and let it bake for 45 minutes. I love peeking through the oven door as the batter slowly rises, turning into a beautifully golden loaf.
- Final Cooling Before Slicing; The last step requires some patience, but it’s worth it. I let the bread cool on a wire rack for about 1 hour before slicing. When I finally cut into it, the loaf is soft, moist, and packed with delicious flavors.
There’s nothing better than enjoying a warm slice with a bit of butter or honey—it’s pure comfort in every bite!
My Favorite Ingredient Swaps
When I bake buckwheat bread, I love experimenting with different flavors while keeping the recipe simple and delicious.
- Maple Syrup; If I run out of honey or molasses, I reach for maple syrup—it adds the perfect touch of sweetness.
- Unsweetened Almond Milk; Since some of my friends prefer a dairy-free version, I often substitute regular milk with unsweetened almond milk, which keeps the bread soft and moist without changing its texture.
- Raisins, Craisins, or Dried Figs; To make every bite more exciting, I sometimes swap dates for raisins, craisins, or dried figs, each one brings its own unique taste.
- Nuts or Sunflower Seeds; For a bit of crunch, I like mixing in filling ingredients like nuts or sunflower seeds, they make the bread feel extra special.
- Mix in Flour; When it comes to flour, I always stick with buckwheat, but I know that changing it can be tricky. If you ever want to experiment, try finding a blend that complements its earthy flavor while still giving the bread a nice, fluffy texture.
Storage
I’ve baked buckwheat bread countless times, and trust me, how you store it makes all the difference.
I always keep mine in an airtight container, like a Tupperware box or a large plastic bag, to lock in its softness.
One mistake I used to make was putting it in the refrigerator, a big mistake! It dries out so fast and turns stale before you know it. Instead, I leave it at room temperature, and it stays fresh for about 3 days—just enough time to enjoy every last slice.
If I ever bake an extra loaf, I always freeze it. The key is to let it cool completely first to prevent any moisture from getting trapped inside. Otherwise, you’ll end up with the dreaded freezer burn. When I’m ready for another slice, I just let it thaw naturally, and it tastes just as good as when it was freshly baked. There’s nothing better than a warm, homemade piece of buckwheat bread that still feels fresh days later!
Nutrition
I love baking quick bread, but finding a healthy recipe that actually tastes good can be tricky. That’s why I swear by buckwheat flour—it’s packed with health benefits and adds a rich, nutty flavor.
Every slice is loaded with vitamins and minerals like B, iron, folate, and magnesium, which help keep me feeling my best.
Since it’s high in protein, it’s a great plant-based source, especially when I need an energy boost.
What I love most is that it contains essential amino acidsand plenty of fibre, and is naturally low in fat, so I can enjoy it without guilt. Pairing a slice with a warm drink like Turkish black tea creates the perfect cozy, health-boosting treat that feels both comforting and nourishing.
Recipe
How to Make Delicious Buckwheat Bread (Gluten-Free)
Equipment
- 1 8×4-inch loaf pan
- 2 Mixing Bowls
- 1 Whisk or Spoon
- 1 Wire Rack
Ingredients
- 2 Cup Buckwheat Flour
- 1 Cup Milk (or Unsweetened Almond Milk for dairy-free)
- 2 Tbsp Honey (or Maple Syrup as an alternative)
- 1 Tbsp Molasses
- 1 Tsp Baking Powder
- 1/2 Tsp Salt
- 1 Tsp Cinnamon
- 1 Tsp Orange zest
- 1/4 Cup Chopped Dried Dates Optional
- 1/4 Cup Chopped Nuts or Sunflower Seeds Optional
Instructions
- Prepare the Baking Equipment: Grease an 8×4-inch loaf pan and preheat the oven to 325°F (163°C).
- Mix Dry Ingredients: In a bowl, whisk together buckwheat flour, salt, baking powder, and cinnamon until well combined.
- Combine Dry & Wet Ingredients: In a separate bowl, pour milk and slowly stir in the dry mixture.
- Add Sweeteners: Mix in honey and molasses, stirring until smooth.
- Enhance the Flavor: Fold in orange zest and chopped dates or any preferred mix-ins.
- Transfer & Bake: Pour the batter into the loaf pan and bake for 45 minutes at 325°F.
- Cool Before Slicing: Let the bread rest on a wire rack for 1 hour before slicing and serving.
Notes
Storage Tips
- Store in an airtight container at room temperature for up to 3 days.
- Avoid refrigeration as it dries out quickly.
- Freeze for longer storage, ensuring it’s completely cooled before wrapping.
Frequently Asked Questions
Is Buckwheat Flour a Good Choice for Bread?
When I first tried making homemade bread with buckwheat flour, I wasn’t sure what to expect. The flavor is more pungent than all-purpose flour, and the loaf turns out darker, but the lighter texture surprised me the most. Unlike many gluten-free breads that feel dense, this one had a nice balance. If you’re looking for a wholesome, earthy option, I recommend using it in bread, it adds depth and richness to every bite!
What are the Pros and Cons of Buckwheat Bread?
I loved how its strong, earthy flavor added depth to my baked goods. The fact that it’s gluten-free and packed with nutrients, fiber, and protein made it even better. But I quickly realized that its darker color might not appeal to everyone, and the bold taste can be a pro or a con, depending on your taste palette.
The biggest challenge? It’s hard to find in-store and often expensive, but for me, it’s worth noting that the unique flavor and health benefits make it a great choice for homemade bread.
Is Buckwheat Safe for Celiac?
I always recommend buckwheat because it’s naturally gluten-free, making it a safe and reliable option for those with celiac disease or anyone following a gluten-free diet. Yes, you can enjoy baking with it without any worries!
Why Should You Let Your Bread Cool Before Slicing?
I know how hard it is to resist cutting into freshly baked bread, the warm, delicious aroma fills the kitchen, making it almost impossible to wait. But trust me, giving it at least 20-30 minutes, or even a full hour, makes a huge difference. I’ve learned that this short wait helps the internal moisture to redistribute evenly, so the loaf sets properly and has a better texture.
I made the mistake of slicing too soon, and the crust lost its crispness while the inside turned dense and sticky. If you’re in a hurry, I get it but a little patience will make every bite so much more rewarding!
Can You Soak Buckwheat Groats for Too Long?
I’ve soaked buckwheat groats at different times, and honestly, there’s no problem if you leave them for more than 6 hours it’s fine to soak them overnight. The shortest recommended time is around 4 hours, but I’ve noticed that the longer they soak, the more distinctive and stronger the buckwheat flavor becomes.
If you love a rich, earthy taste, letting them sit a bit longer might be a great idea!

Hi, I’m the voice behind The Bean Bite — someone who’s genuinely obsessed with beans! What started as a simple love for homemade lentil stew turned into a journey of discovering bean varieties, cooking tips, and their amazing health benefits. This site is my way of sharing that joy with you — one bean at a time.