Cooking brown basmati rice on the stove has become a comforting ritual for me. I still laugh when I think about my first attempt—my best friend convinced me to try meal prepping, but midway through, she called, panicked, because she accidentally added sugar instead of salt. Her sweet, fragrant “rice pudding” was a hilarious reminder that cooking is about fun, not perfection!
I love how brown basmati rice is aromatic, nutty, and nutritious. Its long-grain texture and fragrant aroma make it special. Unlike white basmati, it retains the outer bran layer packed with fiber and nutrients. I usually buy it in bulk bins at my local grocery store and prepare it easily with no special equipment—just a pot or rice cooker.
My foolproof method is simple: rinse the rice, boil water with a pinch of salt and olive oil, then cook until fluffy and perfect.
I store cooked rice in a container in the fridge to make quick curries, stir-fries, or even a breakfast bowl topped with a fried egg. It’s versatile, tasty, and keeps me away from unhealthy snacks on busy days.
Cooking brown basmati rice has become more than a recipe—it’s a comforting habit, full of flavor and memories!
Ingredients
I’ve always loved the comforting aroma of brown basmati rice simmering on the stove.

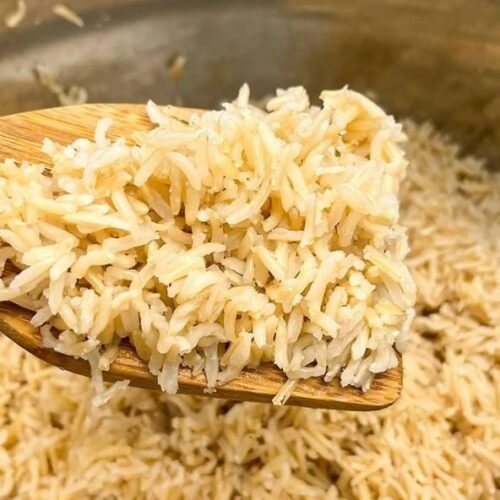
Brown Basmati Rice
- Brown Basmati Rice: To make it just right, I always start with a measuring cup to scoop out the perfect amount of dried brown basmati rice.
- Water: The trick is to measure accurately—too much or too little water can make or break the dish.
I learned this the hard way after a few mushy batches! Now, I stick to the recipe card for precise quantities and get perfectly cooked, fragrant basmati rice every time.
Step by Step Guide
Over the years, I’ve learned that a little preparation goes a long way to avoid issues like clumping, burned taste, or uneven cooking. Here’s my tried-and-true method for consistently delicious brown basmati rice.
1. Rinse the Rice Properly
I always start by measuring 1 cup of uncooked brown basmati rice. Using a metal sieve or fine mesh strainer, I rinse the rice under tap water at the sink. I make sure to rinse thoroughly at least three times until the water runs clear.
This step is crucial because it removes dust, starches, and residues from storage that can make the rice gummy or clumpy.
Then, I let the rinsed rice drip for a few minutes to get rid of excess moisture—trust me, it makes a difference!
2. Cook the Rice on the Stove
I grab a medium saucepan and add 1 cup of rinsed rice, 2 cups of water, and an optional ½ teaspoon of salt. For a touch of richness, I like to add a teaspoon of extra-virgin olive oil.
I bring the mixture to a boil over medium heat without a lid, and once I see the bubbling start, I reduce the heat to low and cover it with a glass lid or tight-fitting lid. Letting the rice simmer gently for 20-25 minutes usually does the trick, but cooking time may vary depending on the type of brown rice.
I always keep an eye on it to prevent burning.
3. Let the Rice Rest
After 20-25 minutes, I check if the water is absorbed and the rice is tender.
If it still needs a bit more cooking, I add a few tablespoons of water and let it simmer for a few more minutes.
Once fully cooked, I turn off the heat and leave the lid on for 10 minutes. This resting time lets the steam distribute evenly, making the rice perfectly fluffy.
It’s tempting to dig right in, but I always let it rest; this step is key!
4. Fluff and Serve the Rice
When it’s time to serve, I gently fluff the rice with a fork to separate the grains. I avoid using a wooden spatula or fingers because it can make the rice clumpy.
The rice turns out perfectly cooked—light, fluffy, and ready to be enjoyed with any dish.
- Instant Pot or Rice Cooker: When I’m in a hurry, I sometimes use these pieces of equipment. I add 1 cup of rice and 2 cups of water, set the cooker to manual or rice setting for 25 minutes, and let it release steam naturally for 10 minutes. It’s an easy method that gives me the same fluffy, delicious rice every time.
Cooking brown basmati rice can be a simple and enjoyable process when you follow these steps. It’s become one of my go-to recipes for effortless, tasty meals.


Give it a try—I’m sure you’ll love the results!
Best Alternatives for More Flavor
I have cooked brown basmati rice in different ways, and one thing I’ve learned is that small changes can make a big difference in flavor. Here are some of my favorite substitutions to make your rice even more delicious:
- Use Broth Instead of Water
- Cooking with broth instead of water makes the rice more flavorful.
- Personally, I prefer using chicken or vegetable broth at the beginning of the process to enhance the aroma.
- Sauté Onions for Extra Taste
- Sauteing onions in a tablespoon of oil or butter before adding the rice creates a great boost of deliciousness.
- This step gives the rice a rich, deep taste that makes it stand out.
- Add Spices for More Depth
- A bit of garlic, cumin, and other spice blends can add warmth and depth to the dish.
- Some people add spices after cooking, but I like to mix them in early so they infuse into the grains.
- Swap Butter with Oil for a Lighter Option
- If you want a healthier choice, use olive oil instead of butter for a subtle but tasty twist.
- Several people prefer this option to keep the dish light yet aromatic.
These small but effective changes have helped me take my brown basmati rice cooking to the next level. Whether you like it rich or light, these simple adjustments will make your rice truly enjoyable!
Nutrition Facts for Cooked Brown Basmati Rice
As someone who enjoys wholesome and nutritious meals, I’ve found brown basmati rice a staple in my kitchen. Knowing the nutritional benefits of what we eat is essential, so here’s a closer look at the nutrients in 1 cup of cooked brown basmati rice:
A standard serving size, such as a plateful (approximately 1 cup or 150 grams of cooked rice), offers a range of nutrients beneficial for a balanced diet.
| Nutrient | Amount per Serving | % Daily Value* |
|---|---|---|
| Calories | 210 kcal | 11% |
| Total Fat | 1.5 g | 2% |
| Saturated Fat | 0.5 g | 3% |
| Trans Fat | 0 g | 0% |
| Cholesterol | 0 mg | 0% |
| Sodium | 0 mg | 0% |
| Total Carbohydrate | 45 g | 16% |
| Dietary Fiber | 3.5 g | 12% |
| Total Sugars | 0 g | 0% |
| Protein | 5 g | 10% |
| Iron | 0.6 mg | 3% |
| Magnesium | 44 mg | 11% |
| Vitamin E | 0.4 mg | 2% |
| Zinc | 1.2 mg | 11% |
| Potassium | 150 mg | 4% |
| Phosphorus | 150 mg | 12% |
Percent Daily Values are based on a 2,000 calorie diet.
Nutritional data sourced from MyFoodDiary.
Including brown basmati rice in my diet has truly made a difference. It keeps me full and energized while providing vital nutrients. Whether you want to make a hearty main dish or a light side, this grain is a fantastic option that adds flavor and nutrition.
Storage and Reheating
I’ve learned from experience that leftover rice can still taste great if stored correctly.
After cooking, I always put the rice in an air-tight container and store it in the refrigerator for 3-5 days. However, the longer it’s stored, the more dried the grains can become. So, I try to reuse it as soon as possible to keep it tasty and fresh.
When it’s time to reheat, the simplest way I’ve found is using a microwave. I place the rice in a microwave-safe container with a lid, break up any large chunks with a fork, and add a few sprinkles of water to create steam and rehydrate the grains. After covering the container, I microwave it for 1 minute. I always remove the lid carefully (watching out for hot steam) and test the rice.
If it feels cold or dry, I repeat the process until I’m satisfied. This method always brings the rice back to life—warm, fluffy, and just as good as freshly cooked rice!
Top Tips
- When cooking brown basmati rice on the stove, I’ve learned that it’s important to follow the right steps to avoid a burnt bottom. Always cook on low heat with a tight-fitting lid to prevent sticking.
- 1 cup of uncooked rice usually yields 2 cups of cooked rice, so plan your portions accordingly.
- A simple trick I use is rinsing the rice before cooking to get fluffier grains.
- In the instructions section, make sure to let the rice simmer gently and avoid lifting the lid too often. Once the rice is fully cooked, let it rest for 10 to 15 minutes before fluffing it with a fork.
These simple steps can greatly improve the texture and taste!
Other Rice Varieties & Cooking Methods
Interested in how I prepare other types of rice? Take a look at the links below for the cooking techniques I use for different rice varieties!
Recipe Card
How to Cook Perfect Brown Basmati Rice on the Stove
Equipment
- 1 Saucepan with Lid Medium Size
- 1 Fine Mesh Strainer For rinsing rice thoroughly
- 1 Measuring Cup For accurate water and rice measurement
- 1 Fork For fluffing cooked rice
Ingredients
- 2 cup Brown Basmati Rice
- 4 cup Water Or use broth for added flavor
- 1/2 teaspoon Salt Optional, to taste
- 1 teaspoon Olive Oil Optional, for added richness
Instructions
- Rinse the Rice Properly:Measure 2 cups of brown basmati rice.Rinse under cold water using a fine mesh strainer until the water runs clear.
- Cook the Rice on the Stove:Combine rinsed rice, 2 cups of water, salt, and olive oil in a medium saucepan.Bring to a boil over medium heat without a lid.Once boiling, reduce heat to low, cover, and simmer for 25 minutes.
- Let the Rice Rest:Turn off the heat and let the rice rest, covered, for 10 minutes.
- Fluff and Serve:Remove the lid, and gently fluff the rice with a fork before serving.
Notes
- For extra flavor, substitute water with vegetable or chicken broth.
- Add cumin, garlic powder, or turmeric for aromatic rice.
- Serve with curries, stews, or roasted vegetables.
Frequently Asked Questions
Here are some of my personal insights on how to cook brown basmati rice and get the best results every time:
What is the ideal water-to-rice ratio for cooking brown basmati rice?
From my experience, the perfect way to cook brown basmati rice is to use 2 cups of water for every 1 cup of uncooked rice when cooking on the stove. This ratio always gives me soft, fluffy rice without being too sticky or dry. It’s a reliable method that never disappoints!
Should I soak brown basmati rice before cooking?
Personally, I don’t soak brown basmati rice, but I always rinse it under cold water until it runs clear. This simple step helps remove excess starch and keeps the grains separate and fluffy. I find that soaking isn’t necessary since the rice already cooks well in about 30 minutes.
How long does it take to cook brown basmati rice on the stove?
Whenever I cook brown basmati rice, it usually takes around 30 to 35 minutes. I bring the water to a boil, then lower the heat, cover the pot, and let it simmer. I avoid lifting the lid too often—it’s tempting, but it helps the rice cook evenly and stay fluffy!
Is brown basmati rice healthier than white rice?
Absolutely! I love brown basmati rice for its nutty flavor and chewy texture. It’s more nutritious because it keeps the outer bran layer, which has more fiber, vitamins, and minerals. It keeps me full longer and feels like a wholesome choice.
Can I cook brown basmati rice in a rice cooker?
Yes, and it’s super convenient! I follow the same 2:1 water-to-rice ratio and use the whole-grain setting on my rice cooker. It always turns out perfectly cooked without any effort—just set it and forget it!
What dishes pair well with brown basmati rice?
I love serving brown basmati rice with curries, grilled meats, and roasted veggies. Its nutty flavor pairs so well with savory and spiced dishes. It even works beautifully in stir-fries or as a side for hearty stews. It’s a staple in my kitchen!

Hi, I’m the voice behind The Bean Bite — someone who’s genuinely obsessed with beans! What started as a simple love for homemade lentil stew turned into a journey of discovering bean varieties, cooking tips, and their amazing health benefits. This site is my way of sharing that joy with you — one bean at a time.