When I first discovered oat groats, I had no idea they were the least processed form of oatmeal. Unlike old-fashioned oatmeal, which is steamed and flattened into flakey pieces, or steel-cut oats that are cut in half, oat groats are unprocessed grains with a chewy texture and a stronger, nutty flavor.
I quickly realized that the long cooking time was the biggest challenge, but once I tried using an Instant Pot, everything changed! Now, it’s my go-to method because it’s the easiest way to prepare this healthy, whole grain without constant stirring.
Cooking oat groats in a pressure cooker is incredibly simple. I just toss in the ingredients, press a few buttons, and walk away, no need to babysit the pot. In about 30 minutes, I have a small bowl of perfectly cooked oats, ready to enjoy. The texture is so satisfying, with each grain holding its shape, making it similar in taste to other oat dishes but even more filling. There are endless ways to use them, whether in a warm breakfast bowl, savory side dish, or even mixed into salads.
My sister’s kids love these oat dishes. I make them for the kids with some sweet additions as experiments on weekends, and they love it.
If you’re curious to learn more, I highly recommend checking out our “What are Oat Groats?“—an easy and simple guide full of helpful tips and recipes.
Once you try this faster cooking method, you’ll see why I love it so much. Just grab a napkin, and get ready to enjoy one of the most tasty ways to eat oats!
Why Use an Instant Pot?
I used to spend so much time watching over a stovetop pot, making sure my oat groats didn’t burn at the bottom of the pan. But ever since I switched to an Instant Pot, cooking them has become effortless. It’s truly the easiest way to prepare them! With the pressure cooker, I push a few buttons, walk away, and let it do the work. It’s a set-and-forget method that saves me time and effort. Plus, I can make a big batch, freeze it, and store it for later, which is perfect for meal prep.
If you don’t have an electric Instant Pot, don’t worry—I’ve tried cooking oat groats in a stovetop, crockpot, and even a rice cooker. While all these methods work, I’ve found that the pressure cooker is better because it’s so fast and convenient.
Now, enough talk, let’s get cooking!
Ingredients
1. Oat Groats
Once, I walked into a grocery store looking for my usual steel-cut oats, but I grabbed a package of oat groats instead. I didn’t notice the labeled difference until I tried to cook them like quick-cooking oats, a big mistake!
After 10 minutes, I stared at a pot of rock-hard grains, wondering if I had bought the wrong thing. That’s when I learned that oat groats are a true whole grain and need extra cooking time.
Here, we learn that you and I should check the package before buying to ensure it is properly labelled as oat groats. After opening the package, they should be stored in an airtight container to keep them fresh.
2. Water
For perfect cooking, I use (1/3 ratio) three cups of water per cup of oat groats. The Instant Pot keeps them soft yet firm. A little extra water makes them creamier, depending on my mood.
3. Salt
A pinch of salt brings out the natural flavor. I always add it before cooking for even absorption. In summer, I love a citrusy twist, while in colder seasons, warm spices work best.
4. Toppings
Serving time is my favorite. I top my oats with apples, walnuts, and pure maple syrup for sweetness. A touch of heavy cream or other milk products makes it rich, while fresh berries and seeds add a light, refreshing taste.
Instructions
- 1. Rinse the Oat Groats; Measure uncooked oat groats using a measuring cup. To remove any dust from storage, put them in a metal sieve and rinse under cool, clean water in the sink. This helps keep the oats fresh and ready for cooking.
- 2. Cook in the Instant Pot; Transfer the rinsed oats into the Instant Pot. Add water (1/3 ratio), secure the lid in the sealing position, and set the pressure cooker to high pressure. Adjust the cooking time to 20 minutes. Once done, let the natural pressure release for 8-10 minutes before opening.
- 3. Release Pressure and Stir; After the pressure settles, use a hot pad to press the pressure release knob carefully to avoid getting steam burned. Open the lid, check for any remaining liquid, and drain if needed. Stir the soft and chewy cooked oat groats with a wooden spoon.
- 4. Enjoy Your Oats; Cooking whole oat groats is a snap when you follow these basic steps. Put them in an electric pressure cooker, add water, and seal the lid. Set the timer for 20 minutes, allow a natural release for 8-10 minutes, then carefully remove the lid. Now, your oats are ready to enjoy!

Pro Tips
- 1. Keeping Warm; You can leave cooked oat groats in the warm setting for up to an hour. However, leaving them too long may cause them to become mushy.
- 2. Handling Extra Liquid; If you notice leftover liquid, don’t worry! Some brands of oat groats absorb water differently. Simply drain the excess or turn on the Sauté Mode to evaporate the moisture.
- 3. Prevent Sticking; If using the Sauté Mode, stir occasionally to keep the groats from sticking or burning.
This method ensures your oat groats turn out perfectly cooked, without being too wet or mushy!
Variations
I usually enjoy oat groats for breakfast, but I’ve discovered they’re just as delicious in savory dishes, soups, and salads. They have a hearty texture that soaks up flavors beautifully. If you’re looking to enhance your groats, here are some of my favorite ways to add more flavor and variety to them!
1. My Favorite Breakfast Oats
There’s nothing better than a warm bowl of oat groats in the morning. I love cooking them in my Instant Pot with a teaspoon of cinnamon or nutmeg for a cosy flavor.
If I want them sweeter, I’ll add a tablespoon of vanilla extract.
Once they’re done, I top them with fresh fruits, nuts, or raisins, plus a drizzle of maple syrup or nut butter. A splash of milk—soy, almond, or cow’s milk—makes them perfectly creamy.

Creamy Oat Groats with Fresh Fruits, Honey, Seeds, and Nuts.
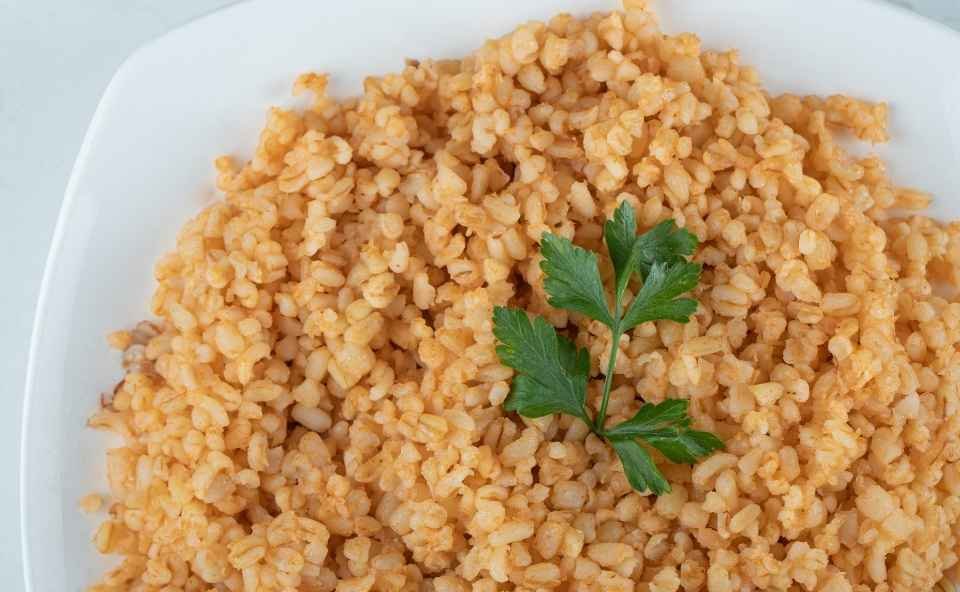
2. A Savory Side I Love
For a savory twist, I cook oat groats in chicken or vegetable broth instead of water. Before sealing the pressure cooker, I add garlic and cumin for extra flavor.
Once ready, I mix in butter, salt, and pepper, and sometimes sprinkle parmesan cheese on top. They’re a great side dish with roasted veggies, grilled meats, or even a salad.
3. Power-Packed Grain Bowls
When I want something filling, I make a grain bowl with oat groats as the base. I top them with sautéed veggies, beans, and meat, or go for a vegetarian option with tofu. A squeeze of lemon or a drizzle of dressing ties it all together, making it a meal I always come back to.
4. Easy and Customizable Breakfast Bowls
Some days, I make my oat groats extra indulgent by adding heavy cream for richness. I love tossing in walnuts, pecans, or cashews, but for a nut-free option, I use chia seeds, sunflower seeds, or pepitas. Fresh apples, berries, or peaches bring natural sweetness, and a touch of honey or pumpkin spice makes it even better.
5. A Sweet Treat with a Protein Boost
When I want something a little indulgent, I mix in dried fruit, like cranberries, and a spoonful of nut butter for extra protein. If I’m in a chocolate mood, I stir in cocoa powder, chips, or cacao nibs. Whether warm or chilled, this feels like a treat while still being packed with nutrients.
The Best Way to Store Oat Groats
I love keeping a stash of uncooked groats in my kitchen because they last a long time when stored properly. The best way to keep them fresh is to place them in a cool place like your pantry, either in their original packaging or a sealed container. If stored correctly, they can stay good for up to two years on the shelf.
When I do meal prep, I like to make a double batch in my Instant Pot and freeze extra portions so I always have some ready to go.
For leftovers, I usually keep cooked oatmeal in the fridge for up to five days, but if I know I won’t finish it in time, I’ll freeze it for up to three months. I find it super helpful to portion it into individual containers so I can take out just the exact amount I need. When it’s time to reheat, I either let it thaw in the refrigerator overnight or warm it in a saucepan with a bit of liquid over medium heat until it’s warmed and creamy again.
One of the reasons I prefer oat groats over old-fashioned oats is that they don’t turn spongy or mushy after 24 hours in the fridge. They stay as individual grains instead of clumping together or drying out like rice. That’s why I always make a big batch for breakfast and store it in an airtight container. If I’m freezing them, I let them cool down first to avoid freezer burn, then pack them in freezer-friendly reusable ziplock bags.
To defrost, I either leave them in the fridge overnight or use a microwave-safe bowl to microwave them slowly for a quick, hearty meal.
Why Oat Groats Are a Great Choice
I love starting my morning with a warm bowl of oatmeal made from oat groats. They’re incredibly healthy and packed with soluble fiber, protein, and iron, which help keep me full and energized. Since they’re a whole grain, they provide lasting energy without the crash. What I appreciate most is that they’re naturally low in fat and have no added sugar, so I can customize the sweetness.
But trust me, it’s easy to turn them unhealthy if you go overboard with brown sugar, maple syrup, honey, or too much dried fruit. I like to mix in just a little sweetness, keeping the flavors balanced while still enjoying a wholesome meal.
One thing to keep in mind is that, while oat groats are naturally gluten-free, they can come into contact with wheat or barley during processing and transportation. If you need to avoid gluten completely, make sure to buy oats that are clearly labelled gluten-free. I don’t have to worry too much, but for those who do, it’s always better to double-check.
No matter how you prepare them, oat groats are a fantastic, nourishing choice to fuel your day.
Recipe

How to Cook Oat Groats in an Instant Pot (Pressure Cooker)
Ingredients
- 1 Cup Oat Groats
- 3 Cup Water (1/3 ratio)
- 1 Tsp Salt
Optional Toppings
- Fresh fruits (Apples, Berries, Peaches)
- Nuts (Walnuts, Pecans, Cashews)
- Seeds (Chia Seeds, Sunflower Seeds, Pepitas)
- Sweeteners (Maple Syrup, Honey)
- Spices (Cinnamon, Nutmeg, Pumpkin Spice)
- Dairy (Heavy Cream, Soy Milk, Almond Milk, Cow’s Milk)
Instructions
- 1. Rinse the Oat Groats: Measure 1 cup of oat groats and rinse them under cool, clean water using a metal sieve.
- 2. Cook in the Instant Pot: Transfer the rinsed oats into the Instant Pot, add 3 cups of water, and a pinch of salt. Secure the lid and set the pressure cooker to high pressure for 20 minutes.
- 3. Natural Release: Allow the pressure to release naturally for 8-10 minutes.
- 4. Check and Stir: Carefully open the lid, check for any excess liquid, and drain if needed. Stir the oats before serving.
- 5. Enjoy: Serve with your favorite toppings.
Pro Tips
- Keep warm in the Instant Pot for up to 1 hour to avoid mushiness.
- If there is excess liquid, drain it or use the Sauté mode to evaporate moisture.
- Stir occasionally when using Sauté mode to prevent sticking.
Storage Tips
- Fridge: Store cooked oat groats in an airtight container for up to 5 days.
- Freezer: Freeze cooked oat groats in portioned containers for up to 3 months.
- Reheating: Reheat on the stovetop with a splash of water or milk, or microwave slowly in a microwave-safe bowl.
Notes
- Sweet Breakfast Oats: Add cinnamon, nutmeg, or vanilla extract during cooking and top with fresh fruits, nuts, and maple syrup.
- Savory Side Dish: Cook with chicken or vegetable broth instead of water, add garlic and cumin, and top with butter, salt, and Parmesan cheese.
- Power-Packed Grain Bowl: Use oat groats as a base and add sautéed veggies, beans, meat, or tofu with a drizzle of dressing.
- Indulgent Breakfast Bowls: Add heavy cream, walnuts, or pumpkin spice for richness.
- Sweet Protein Boost: Mix in dried fruit, nut butter, or cocoa powder for a delicious, nutrient-packed meal.
- High in fiber, protein, and iron
- Whole grain with long-lasting energy
- Naturally low in fat and sugar
- Holds texture well without getting mushy
Comparison
Here are the comparisons that I’ve put together to explore the unique differences, uses, and cooking methods of oats versus other grains.
Frequently Asked Questions
Should I Soak Oat Groats Before Cooking?
I usually don’t soak oat groats, but when I’m short on time, I find that soaking them overnight really speeds up the cooking time. I just toss them in a bowl, cover them with water, and let them rest in the fridge for several hours. When I’m ready to cook, I drain the water, rinse the grains, and use fresh water to get the best texture.
It’s a simple extra step that makes mornings a little easier!
Are Oat Groats Healthier Than Other Oats?
I always prefer oat groats because they are the least processed form of oats, which means they hold on to more nutrients than other varieties. Every grain goes through some nutrient loss when processed, but honestly, the difference is so minimal that it doesn’t really impact your health in a big way.
If you love the hearty texture of oat groats, go for it! But if you enjoy steel-cut or rolled oats, you’re still getting plenty of good nutrition, so eat what makes you happy.
Are Oat Groats the Same as Oatmeal?
When I first started cooking with oat groats, I was surprised to learn that they’re just a less processed version of oatmeal. The difference comes down to forms and texture. Old-fashioned oats are steamed and then flattened into flakey pieces, making them quicker to cook. Meanwhile, steel-cut oats are simply cut into smaller bits, giving them a hearty, chewy bite.
Both types have their charm, and I love switching between them depending on my mood.

Hi, I’m the voice behind The Bean Bite — someone who’s genuinely obsessed with beans! What started as a simple love for homemade lentil stew turned into a journey of discovering bean varieties, cooking tips, and their amazing health benefits. This site is my way of sharing that joy with you — one bean at a time.